Editor Overview
The Flint editor has three main areas working together:
- •The canvas is your live page preview. Everything you see is exactly what visitors will see.
- •The AI chat panel is where you describe changes in plain language and Flint handles the rest.
- •The top toolbar gives you access to pages, settings, sharing, undo/redo, and publishing.
You can work in either the AI chat or directly on the canvas. Most workflows use a mix of both.
Making Changes with AI Chat
The AI chat panel is your primary tool for making larger or more complex changes. Just describe what you want in plain English.
Examples of what you can ask:
- •"Change the headline to focus on our enterprise customers"
- •"Add a three-column features section below the hero"
- •"Make the CTA button larger and move it above the fold"
- •"Rewrite the hero copy to be more direct"
- •"Add a testimonials section with three quotes"
Flint reads the context of your current page, makes the changes, and shows you the result immediately in the canvas. You can keep refining with follow-up messages in the same conversation.
Direct Editing
For quick text and image updates, click directly on any element in the canvas to edit it inline. No need to open the chat.
How it works:
- 1.Click any text on the page to select it
- 2.A text cursor appears and you can type your new content
- 3.Click away or press Escape to confirm
Direct editing is fastest for small copy changes, such as updating a headline, fixing a typo, or tweaking a button label. For structural changes (adding sections, changing layouts, reordering content), use the AI chat instead.
Tip: You can also click an image on the canvas and describe a replacement to the AI chat. Flint will use your asset library or generate a new image based on your instructions.
Having Issues with the Editor?
If the canvas or editor isn't responding as expected — for example, elements aren't selectable, edits aren't applying, or the canvas isn't loading correctly — see our Troubleshooting Page Building Issues guide for common fixes and solutions.
Adding Assets
You can add images, videos, and logos to your pages in several ways:
Upload an image directly
- Attach an image to the AI chat and ask Flint to use it on the page
- Uploaded assets are saved to your asset library and can be reused across pages
Generate an image with AI
- Ask Flint to generate an image: "Generate a hero image showing a team collaborating in an office"
- You can provide a reference image to guide the style
Use an existing asset
- Ask Flint to use an image already in your library: "Use the product screenshot from our asset library in this section"
Add a company or partner logo
- Ask Flint to add a logo for any company: "Add the Salesforce logo to the integrations section"
- Flint fetches real, high-quality logos automatically
Add a video
- Paste a Loom, YouTube, or direct video URL into the chat and ask Flint to embed it
- For hosted videos (Mux), Flint handles the embed automatically
Selecting Elements for Context
When you click an element on the canvas, Flint passes that element as context to the AI chat. This means you can:
- •Click a section and say "make this section's background dark"
- •Click a button and say "change this to a secondary style"
- •Click an image and say "replace this with something more modern"
Using selection removes ambiguity. Instead of describing which element you mean, you point to it directly and describe the change. This is especially useful on pages with multiple similar sections.
Undo and Redo
Made a mistake? Use undo to step back through your changes.
- •Undo: Click the undo arrow in the toolbar, or press Cmd+Z (Mac) / Ctrl+Z (Windows)
- •Redo: Click the redo arrow, or press Cmd+Shift+Z / Ctrl+Shift+Z
Undo and redo work across all types of changes: AI-generated edits, direct text edits, image updates, and section additions. Your full edit history is preserved during your session.
Switching Between Pages
Your Flint project can contain multiple pages. All pages in your project are listed in the left drawer. Click any page name to open it in the canvas.
Changes you make on one page do not affect other pages, unless you edit a shared component like the navigation or footer.
Renaming a Page
You can rename any page directly from the left sidebar without using the AI chat.
- 1.Hover over the page you want to rename in the left sidebar
- 2.Click the three-dot menu that appears next to the page name
- 3.Select Rename from the menu
- 4.Type the new name and confirm
Renaming a page updates both its display name and its URL. For example, if you rename a page from "agents" to "lp/agents", the URL changes from example.com/agents to example.com/lp/agents. The new URL takes effect once you publish your changes.
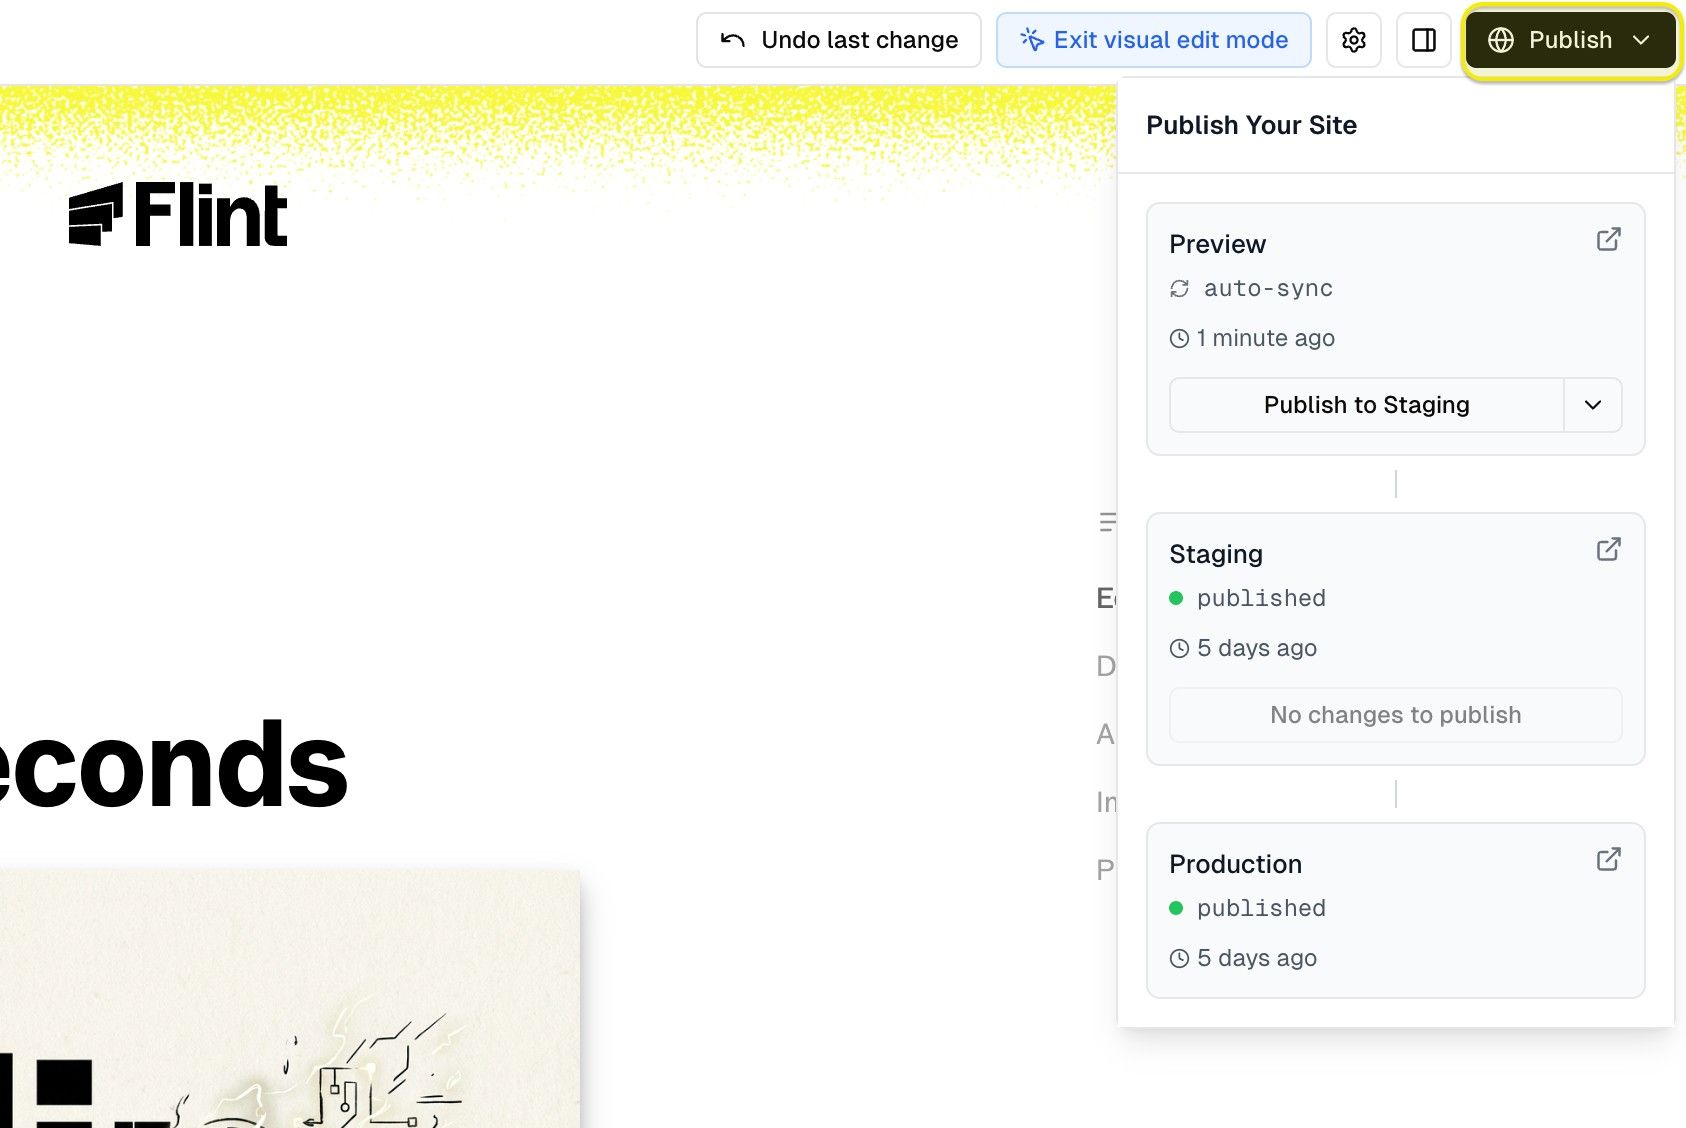
Publishing Your Changes
When you are ready to push your changes live:
- 1.Click the Publish button in the top right of the toolbar
- 2.Flint summarizes all the changes you have made since your last publish
- 3.Review the summary, then click Publish to make your site live
Publishing typically takes under a minute. Your site will be live at your configured domain once complete.